Walkthrough
Updated and complete walkthrough for the PC game ANIMAL (1996-1997)
Thanks to Gazza Bennett for the original, posted on The Spoiler Centre
Rewrite/new sections by Kait Bell, 2023 (contact info at the bottom)
PRESS F6 FOR THE MENU
The manual print is incorrect (how do you screw that up?!)
The menu allows you to save, load, screw with volume settings etc.
In the 3D/Doom-clone sections, access settings with F1.
Please check the Controls page for an overview of the controls.
By the way, you can’t save in the 3D section, because the game designers hate you.
FIRST WORDS
After the intro sequence, you’ll start in Peperami’s living room.
To select an action press keys F1-F5, or right-click the mouse and move it left to right. Right-click again to cancel the action and go back to the regular walking mode.
Pick Up the letter on the fireplace mantel. Note your lack of $nackers, the in-game currency.
“Use” the Bureau to open it, and Pick Up the duster inside. (You may accidentally “use” the bureau again - it has happened to me on a couple playthroughs - so please ensure you Pick Up the duster to avoid further frustration)
You may have noticed that the door is locked by now, so try using the Chair or TV to access HITS - the Home Interactive Transportation System that you will use throughout the game.
A helpful tip from here - the brief transportation cutscenes can be skipped if you click the mouse while playing (does keyboard work?)
On the HITS map screen, select Peperami Hall, then Main Entrance, and travel. Please note that the darker text is the highlighted selection for the Peperami Hall screen and the lighter button when selecting whether to travel or cancel. Yes, this is a very, very stupid choice.
PEPERAMI HALL
You can exit from the main hall by clicking on the middle of the screen, where a blue “EXIT” icon appears.
These “EXIT” icons are important to navigating Peperami around Snackopolis, but have not been placed very well. You may have to move your mouse across the entire screen to find them. In particularly “difficult areas” I will provide some help.
Now you are at the bottom of a large pinkish white hall. Click the EXIT point at the bottom of the screen, which will take you to a large staircase.
Before you ascend it, Pick Up the small matchbook at the bottom left. The Nut Baron’s Bar will come into play later in the game.
Use the Red Carpet of the staircase to ascend them. Curiously, Peperami Hall is the only area in the game where you have to Use something to ascend stairs.
At the top you will see the janitor-biscuit who has been mysteriously killed. Before leaving the grisly scene, make sure you Look At his body, which will reveal a set of Keys which you can then Pick Up.
You will see three doors to your right and an elevator (or lift) to your left. The first two doors are not important and Using them will cause funny things to happen to Peperami. Use the furthest door, at the back of the screen, to continue into the Green Room.
In the Green Room, pick up the chair. Then you can begin exploring the rooms. The left is Peperami’s bedroom, the middle is the living room (where you started the game), and the right is the kitchen.
Use the keys from your inventory to unlock the doors. You’ll notice when selecting the Use mode that an icon in the bottom right of the screen will appear, click it to open the inventory.
There is nothing else to do in the Living Room at the moment so no need to explore it right away.
In the Bedroom, pick up the guitar, pizza (on the bed), slippers (under the bed) and the piggy bank. Picking up the piggy bank will give you the money you need to proceed through the rest of the game. Use the amplifier to turn it on, then use the guitar on the amplifier. No need to worry about turning the amp off, using it again won’t do anything.
In the Kitchen, you can look at the Washing Machine to confirm that the smell is, in fact, your old socks. You’ll want to pick up the Frying Pan on the stove and Knife stuck in a can on the far right on the screen. The cans are totally unnecessary despite them being drawn as though they are able to be picked up. The cupboards in the middle of the screen are openable (Use them) and doing so will reveal a cheese grater which you should also pick up.
Now you can exit back to the Green Room and head down to the First Floor Landing. From here you can use the Turbo Lift, that big cylinder shaped thing on the left near the railing. This elevator will take you to Lower Ground 1 or Pepereinstein’s Laboratory, but the developers hate you for some reason and picking the opposite choice will take you to the desired floor. So for example, to proceed we need to get some things in Pepereinstein’s Laboratory, so we will select that we are going to Lower Ground 1. Yes, this is a terrible, awful decision.
In the Laboratory, (again, make sure you are in the Laboratory by stating you want to go to Lower Ground 1). When you get there make sure you pick up the torn paper on the ground, on the left side. Now use the Bench. Pick up the itching powder and oven gloves.
Then exit the bench at the bottom right of the screen. Go to the other side of the lab by clicking the Exit icon on the bottom right once more.
From here, you will use the Chair you picked up earlier in the green room on the bookshelf. Pick up Pepereinstein’s cloning manual from here, you will see that the bottom part of the page is torn and that is where the torn piece of paper is from, however, it’s only one piece of the puzzle.
You surely will have heard the loud snoring by now. It’s coming from the cupboard just beneath the bookshelf. Open it up to reveal the Cowardly Biscuit having a snooze inside. Due to you playing as Peperami, you must wake him up in a cruel and unusual way: use the balloon on the biscuit, which will inflate it, then use the knife on the balloon to pop it. What an asshole you are. Talk to him (you can choose any dialogue options here).
After you’re done talking, the Biscuit will leave, but he’s left his pillow behind, so we’ll pick up the pillow for him. Now exit by clicking the bottom left of the screen twice (the second time move your mouse up a little bit). Now use the Turbo Lift again and return to the first floor (REMEMBER to select Lower Ground 1 to go to the first floor). Go back to the green room by using the furthest door. From here we go to the Living Room (middle door, use the key on the door if you haven’t unlocked it yet) and then will access HITS again by using the TV or chair. Select Docklands and travel there.
DOCKLANDS
All we need here is the wrench, so pick it up and then use the monitors that you just exited from to return to the HITS menu, and this time travel to Tuber Towers.
TUBER TOWERS
Pick up the flowers in the large vase, then use the doors to enter the towers. You’ll see a pimento who is sleeping on the job. Use the EXIT icon on the floor below him to get a bit closer. In the boxes behind him (second row first column) there is a note which you can snatch. You can leave by exiting to the bottom right… or you can attack the pimento, or try to pick up the $nackers in his pocket, which will wake the pimento up, and he will promptly eject you from the building. From here use the HITS monitor and travel to Crumbs Night Club.
CRUMBS NIGHT CLUB
You’re at the top of a staircase railing. Use the top concrete tile to descend the stairs and come to a payphone. There is an Invitation tucked behind the phone which you will need, so pick it up, and there are some extra $nackers in the coin return.
HIGHLY RECOMMENDED CHEAT: Use the phone and dial 291069. Someone will say “NUTS”. This skips a dumb section where you come back to this phone and do the same thing (the game is only looking for the number to have been called and isn’t looking at the point in the game when it was called). This may save a bit of pain for those using this walkthrough as a guide.
There are a few numbers you can call if you want a laugh, but none are necessary excluding the one mentioned in the recommended cheat. Click on the black slot where the reciever hangs to end the call. Okay… from here, exit using the stair directly below you to the nightclub entrance.
Attack them. Just attack them. When they kick you to the dumpster you will climb out and notice a garbage can to your right, attack it and look at the trash that it deposits to discover a crowbar. While picking up the crowbar, remember that this game predates Half-Life by two years then exit near the bottom left.
Now exit the left of the… veghole cover (yes, seriously) and pick up the hammer on the top of the crates. If you are a sadistic son of a bitch you can attack the biscuit. Exit to the bottom right and use the crowbar on the veghole cover (to loosen it I guess) then pick up the veghole cover.
Now you will FINALLY enter the nightclub. But a phallic mushroom asks you to show what’s on offer… so why not show him the veghole cover? (You can select any dialogue options here). He’ll pay you 60 $nackers and take it off your hands. Now exit the front at the bottom of the screen.
Go to the bar by using the EXIT icon very closely above where Peperami enters. Talk to Regina Raisin, who is an early transgender character in videogames, why it had to be this game of all things is beyond me. Choose any dialog options. When she stops talking, talk to her again (still choosing any dialog options) and when she asks for a drink, talk to the bartender. From here she will give one of three hints so choose whatever you’re most curious about, and after she’s done talking she’ll leave the club.
All this talking sure makes you thirsty, so get a drink from the barman… (and maybe get another one after that just in case one isn’t enough…). You complain that the beer is really strong, “bottom-of-the-barrel” and the barman goes to check if there is any more beer in the back. While he’s gone, take the key that you have surely seen hanging behind him, then exit to the bottom of the screen at the dancefloor.
Use the key you just got on the metal panel that’s on the wall, revealing a water pipe. Use the wrench on said pipe because Peperami is a sadistic son of a bitch and proceed to kill everyone in the bar. You now have access to the bathrooms, so go to the men’s toilets (the women’s toilet contains a stupid joke that is stupid).
Use the urinal because it’s the funniest thing in this stupid fucking game and then use the urinal on the left to play a short cutscene. A perfume bottle which you might not have noticed before (because it wasn’t there) is now present on a small shelf at the back, so pick it up and continue through this slog, for the love of God.
Exit towards the bottom right. Congratulations on completing the first of three days. If you’re not mentally drained yet, many congratulations to you. And if you haven’t saved, do so now (press F6 to access the menu).
PEPERAMI HALL
Use the guitar on the amp (no need to turn it on this time). Thanks to the miracle that is video game logic, you are now good at guitar. Use the door to exit to the green room and pick up the newspaper on the floor.
From here use the middle door to go to the living room and now use the chair or TV to access HITS. Travel to the Calorie Gallery.
CALORIE GALLERY
Use the exit at the bottom of the stairs to travel to the gallery entrance. Use the itching powder on the guard because, once again, you are a sadistic stick of processed meat. He drops his large staff which has a piece of the cloning code on it for whatever goddamn reason, so pick that up and then get the hell outta here by exiting at the bottom of the screen. Use the HITS monitor and head back to Tuber Towers.
TUBER TOWERS
Again, use the door to enter the towers, however once inside you will notice the pimento guard is missing. Use the exit icon at the bottom left of the back’s green wall and you will encounter an elevator and someone trying to repair it.
Talk to him (choose any dialog option) and talk to him once more (again, either option) and he will trade you the wire cutters for your crowbar.
You can cut the wire of the Vega Lisa painting to the right and give it to the potato that’s pasting up a poster in the Calorie Gallery for 20 $nackers, but this is totally optional.
Exit back to the entrance of the towers and use the HITS monitor. Head on over to Downtown.
DOWNTOWN
You’re in a TV store and you can exit at the bottom right of the screen. Then exit to the right sidewalk. The cab driver, Lionel, will ask where you want to go. And you have two options which are essentially the same. Lionel pussies out and it’s up to you to get to the Nut Baron’s Bar now. Let’s head there.
Exit to the right, then exit towards the bottom of the screen. You’ll be outside the tattoo parlour, which you can enter if you like for a short comedic scene or continue up the sidewalk. You’ll walk headfirst into a pole. Use the wirecutters on the fence (make sure you’re not using them on the crate) then attack the fence to open a hole which you can then use to access the back alley. Exit on the bottom right hand side (icon is in a garbage can for whatever reason).
Use the door to the Cheap Shot gun shop to enter - of course, when the doorman asks if you have been invited or referred, select Invitation (remember, we got this invite from a payphone earlier). Immediately press the alarm button on the counter once you enter. (Select any dialog option when the narrator scolds you.) When Almond Terminutter comes out, use the bunch of flowers you got from Tuber Towers on him to disable him, because video game logic. He drops a steel toe cap, pick it up and use it on the case with the trumpet-looking device (the Blunderbuss). Alright, get outta here and go elsewhere before you have an aneurysm.
Exit to the right, then to the right again. Do not pick up the wallet on the way - it launches you back to the start of the town and you’ll have to traverse your way back. This is a warning.
In a garbage can there is a book sticking out. Pick it up then go back left to the screen with the wallet (again don’t pick it up). Exit towards the wooden fence at the back (the icon is below the fence).
Attack the fence three times - yes, really. After the short cutscene exit to the back right. You’re in front of the Nut Baron’s Bar… and of course, Lionel is here (choose any dialog option). Then exit just below where the bouncers are standing and speak to Derek (on the right, choose any dialog option). Then speak to him again and you will play a sick guitar solo for the bar patrons, granting you entry.
NUT BARON’S BAR
You will notice that Regina Raisin is here, so go talk to her (exit icon right below her barstool). You can select any dialog option, but she will nevertheless give you the number to the Nutcracker Suite. Exit the bar at the bottom left and then the bottom of the screen.
Please note: if you did the Highly Recommended Cheat, you may skip from this point to the next Nut Baron’s Bar section.
Go back towards the bouncers and use the HITS monitor to their left. Travel to the Crumbs Nightclub.
CRUMBS NIGHT CLUB
Use the top concrete tile to descend the stairs to the payphone again. Dial the phone number (291069 if you’re too lazy to look at the inventory), someone will say “NUTS!” and hang up. Though it may seem like an error at first, this is in fact your answer, so you can now go back up the stairs (exit icon is on the stair that Peperami is standing on) and use the HITS monitor to return to the Nut Baron’s Bar.
NUT BARON’S BAR
If coming back from the nightclub, enter the bar again.
You need to talk to the barmaid again for a second, so go back to the bar and talk to the barmaid. When she offers a veggie burger, reply with “VEGGIE BURGER??”, then when she asks if you don’t fancy it, say “Oh, go on then. Just for you”. After that odd happening, exit to find a totally empty bar, excepting the door at the back.
The exit icon for the back door is in an odd location just to the right of the stage. Talk to the peanutter guard and when he asks you for the password reply “Nuts to you!” and he’ll let you enter the General’s room.
You can talk to him if you like but all you need from here is the cans at the bottom. Leave the scene at the bottom left and congratulations, day two is now complete. Save now if you haven’t in a while, and prepare for the worst.
PEPERAMI HALL
Use the door to the green room. There’s another newspaper but you can’t pick it up for whatever reason. Go to the kitchen and use the pizza in the oven. It will ding when ready, but make sure to use oven gloves on the oven so your hands don’t get burned. Now you can exit the kitchen, go to the living room and use the TV or chair to enter HITS. Travel to Downtown.
DOWNTOWN
Exit the TV store at the bottom right, then exit the sidewalk to the left. Exit up towards the “Craft”/“A” “M” “B” signs. If you haven’t been here yet, a long-ish cutscene will play.
After that’s over with, use the door to Toni’s Pool Hall. You can select any dialogue options with the doorman. After the most fantastic fart, attack the mushroom struggling to play pool. This will launch you into conversation with Toni Tomazo.
Select any dialogue options, but when he says “you dare visit me without a gift?” reply “No, of course I’ve brought you a gift” and give him the pizza you just cooked. Toni will give you another piece of the cloning code and a bottle of wine. You can now exit the bar at the bottom of the screen.
Exit to the right outside of the pool hall, then head back towards the motel with a picture of Pepereinstein on it. You’ll encounter a potato bum, give him the wine bottle from Toni and he’ll do a magic trick for you (select any dialogue option). He leaves behind a button for you to pick up.
Now head left towards the TV store, then into the store, and use the HITS monitor on the left. Travel to Tuber Towers.
TUBER TOWERS
Use the door to enter the Towers. Unfortunately, the pimento guard is back and awake, and he will kick you out no matter what. If you go back, though, Peperami will somehow manage to kill him with a feather duster… alright, well, go to the bottom left of the back green wall to the elevator once again. Use the lift and then the lift panel - note the penthouse button is missing - but we just got a button, so use it on the panel, and now you can use the panel and select the penthouse.
Exit to the right to encounter Cake Mousse. Give her the Lemon Essence perfume you got a while back and you will enter a conversation with her, you can choose any dialogue options. However, the conversation comes to a mysterious ending… and you are suddenly trapped!! We got a Houdini book earlier, because video game logic, so use it on your restraints and you will be freed. Now attack the old pipe to your right three times, and the basement will fill up with water!
Please prepare for the second most mind-numbing and awful section of this game.
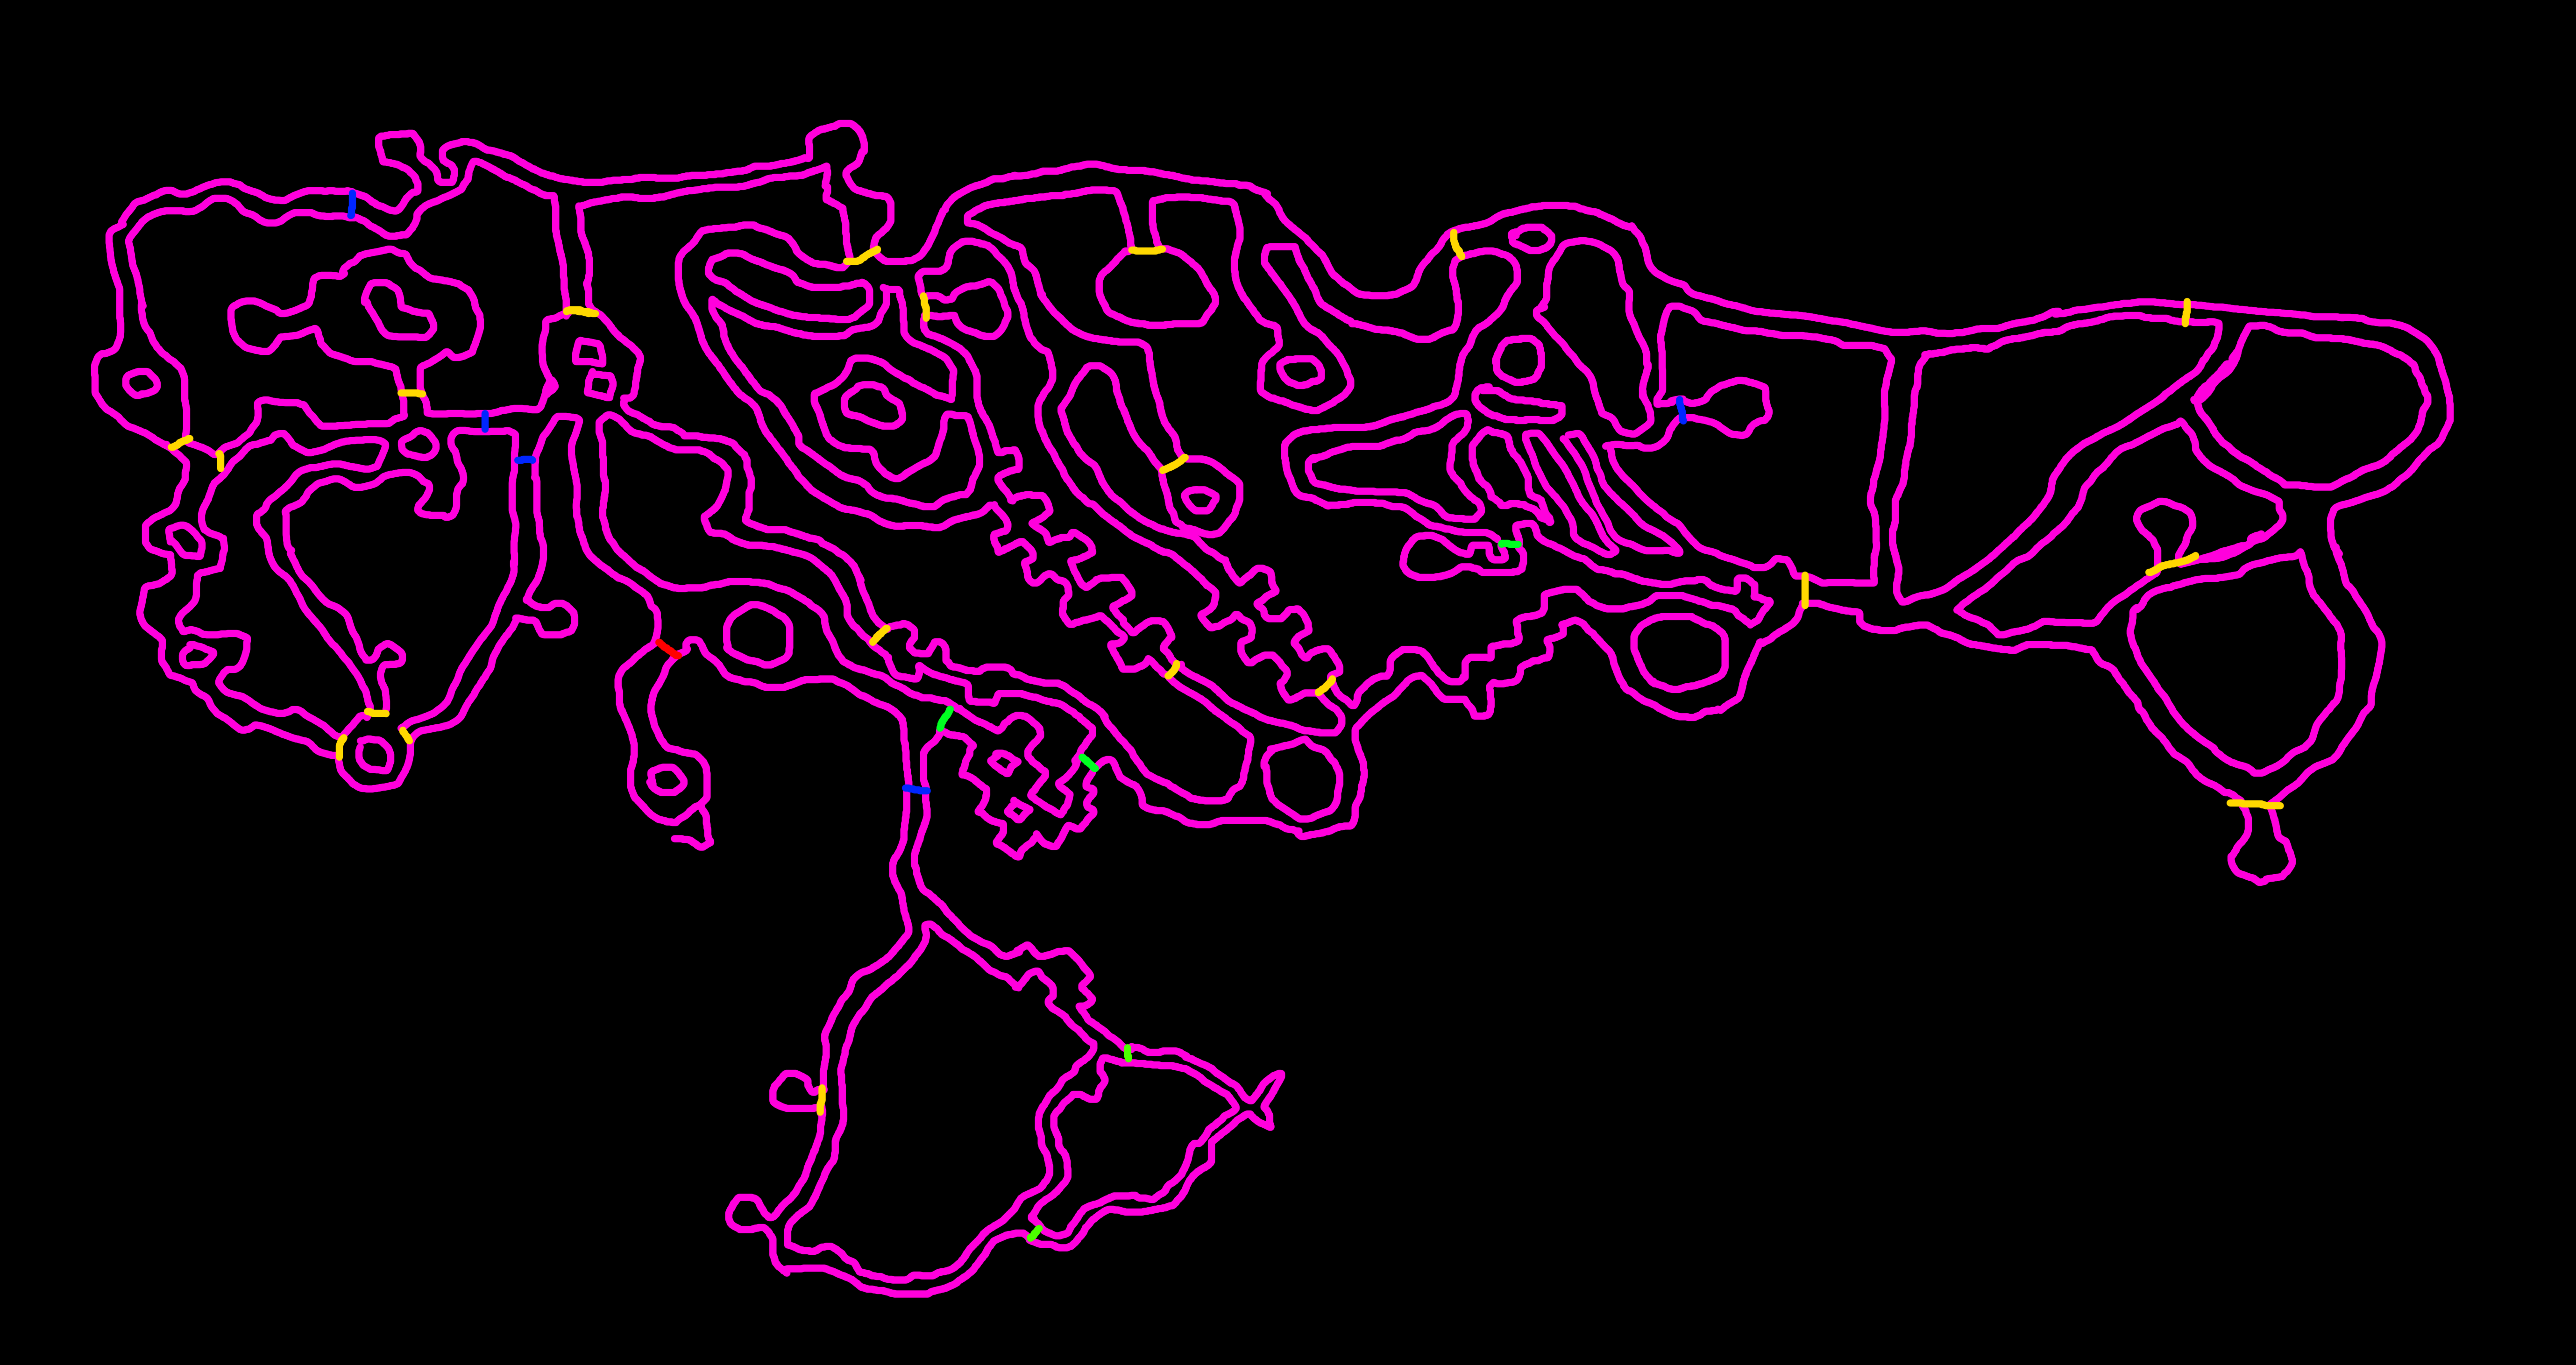
SEWERS
HIGHLY RECOMMENDED CHEAT: Type “BTITS” at any time to activate Super Peperami Mode. This will give you all the keys and invincibility. This mode cannot be deactivated once activated, and it does not have any effect on your save.
Welcome to hell. Most walkthroughs, video or text, completely give up at this point. But I have a gift for you. Obviously, I cannot give you the exact directions to go… but, I have completely mapped out the sewers as an easy guide. This makes the section a whole lot easier.
Please click this link to see the map.
I also found some undocumented functions in this 3D mode, please go to the Controls page to view. Generally, the basic controls are the same as the original DOOM for PC, using up/down/left/right to move, Ctrl to shoot, etc.
You can also use Z/X to strafe left and right (the game manual amusingly calls this “sidestepping”).
You need to collect 7 CDs and a piece of the cloning code that are strewn about the maze. Press the Tab key to bring up the map (with a fog-of-war effect) in game, use numpad -/+ to zoom in/out. Use my map and you should be able to figure it out in maybe about 30 minutes.
If you don’t have that kind of time, are just generally lazy, or you give up, please view the next recommended cheat.
RECOMMENDED CHEAT FOR WHEN YOU JUST GIVE UP: This alternative version of the map which has all the items marked with coloured dots.
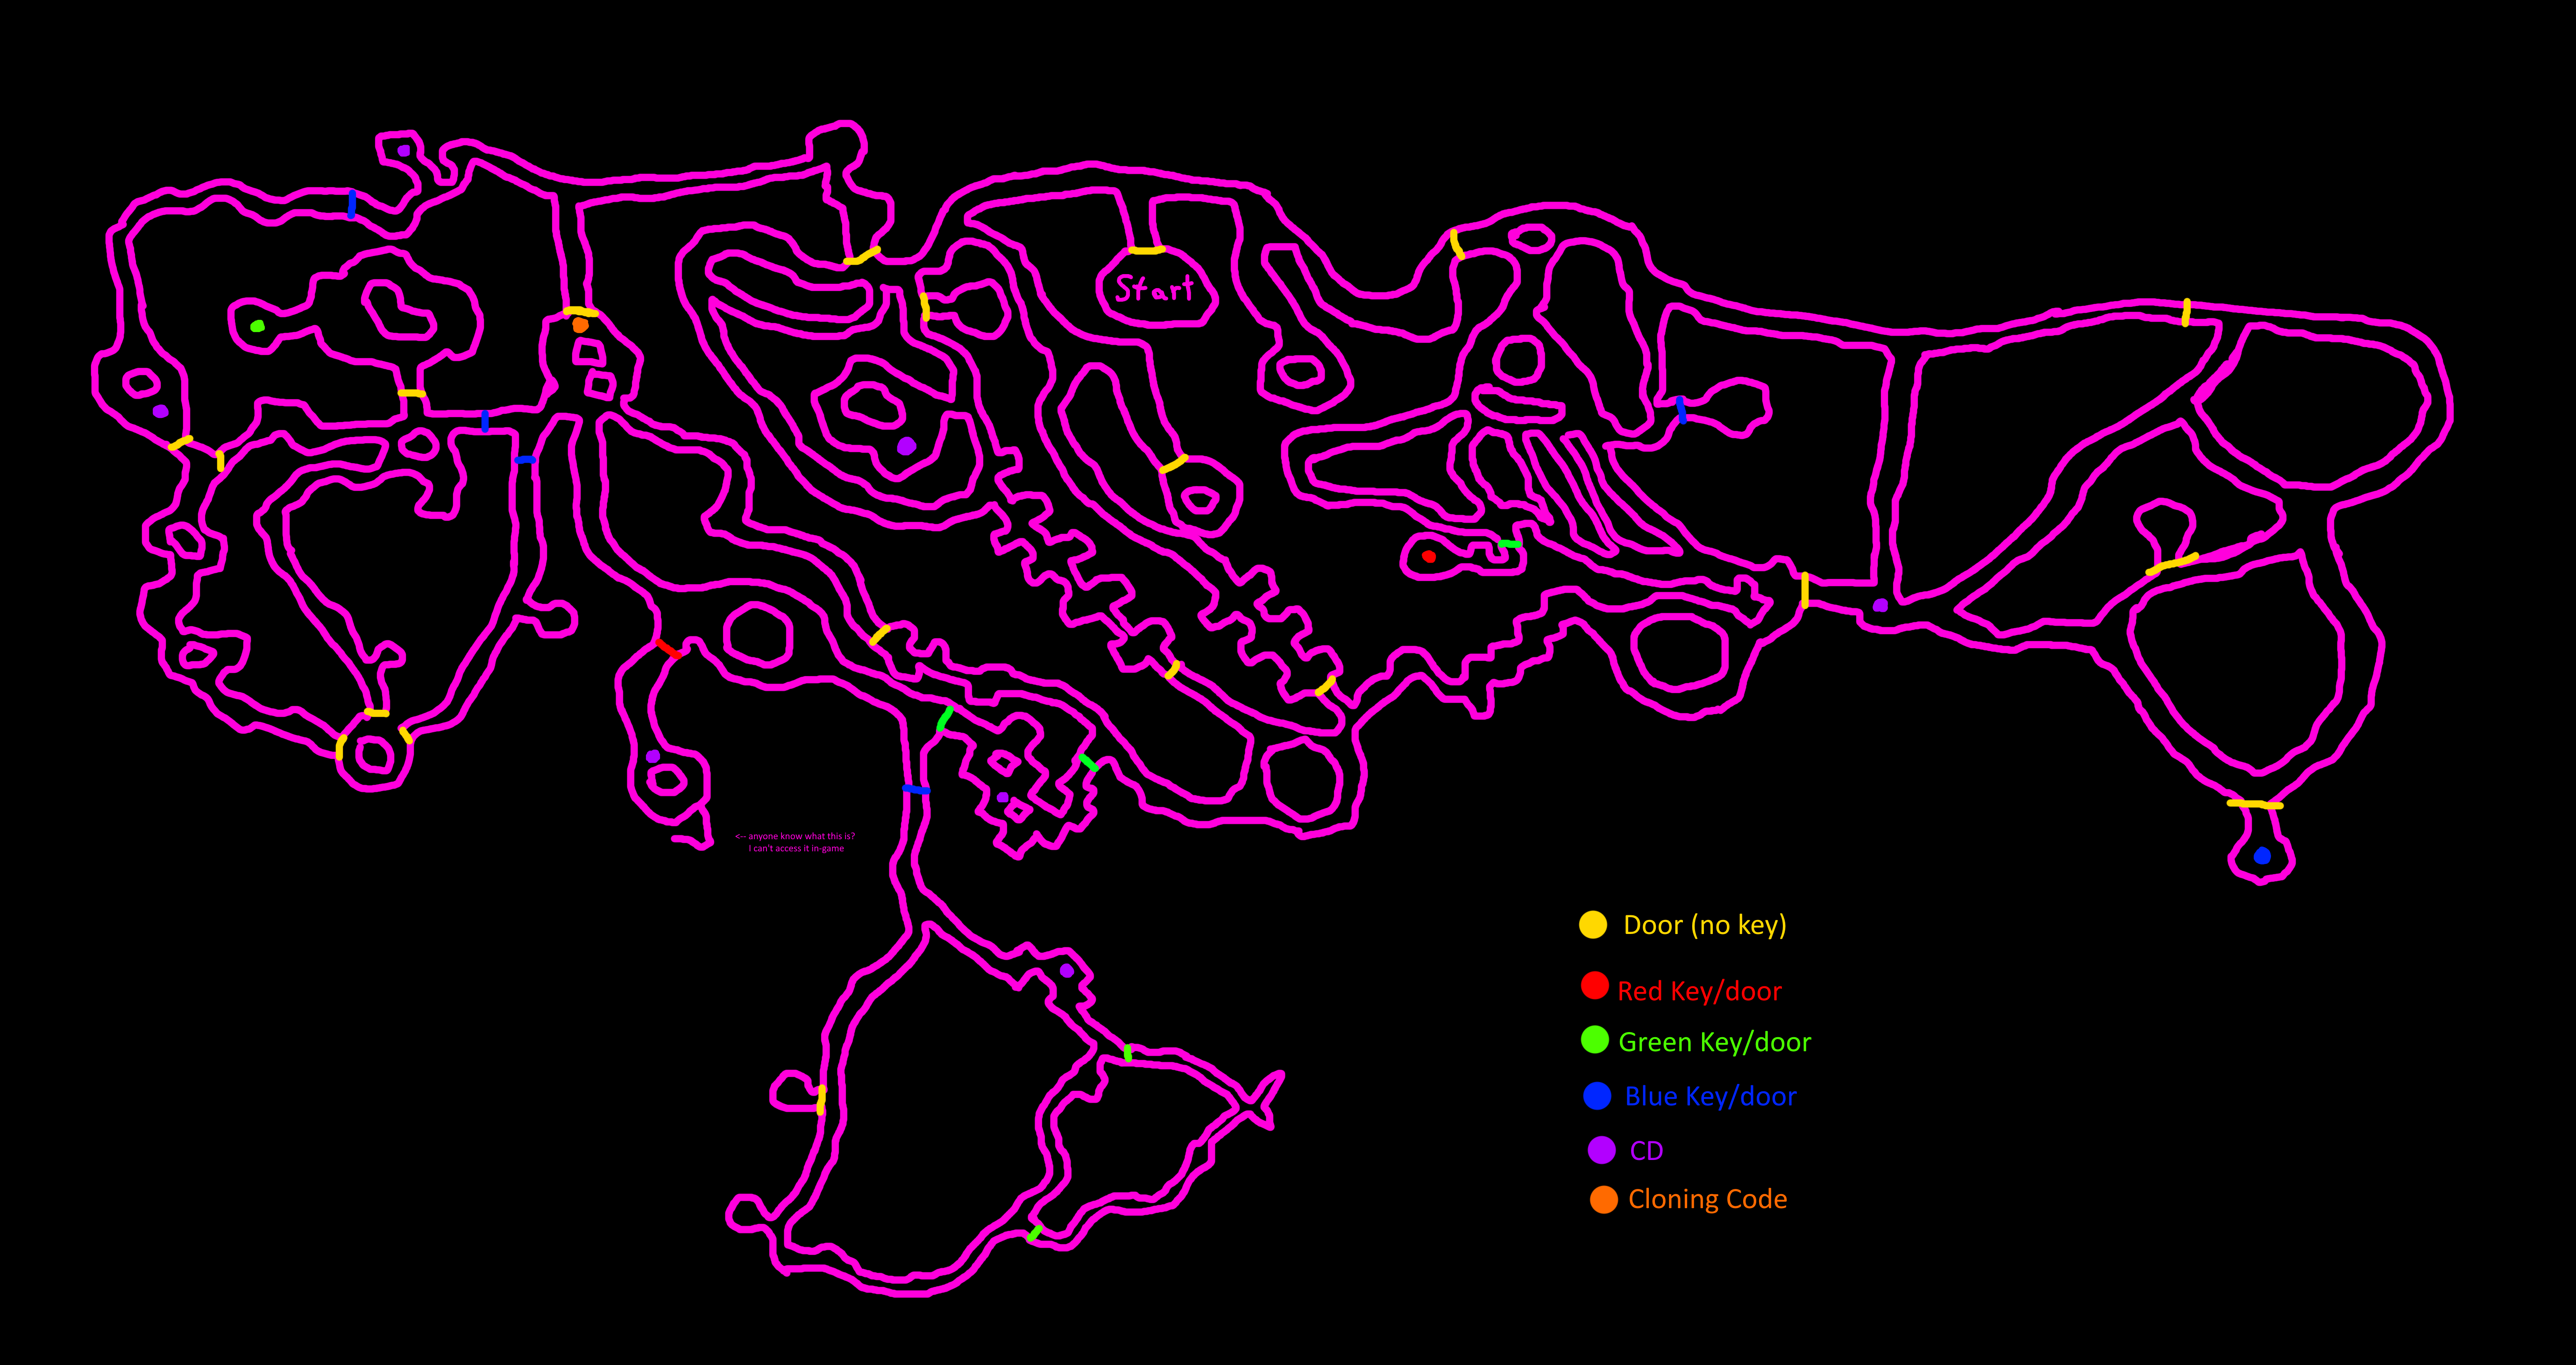
PEPERAMI HALL
Alright, now that we’re done, Pepereinstein is saved. Let’s head from the living room into the Green Room, then to the first floor landing. A cutscene will play.
After the cutscene is done, use the Turbo Lift and go down to Lower Ground 1 (remember, you have to say Pepereinstein’s Laboratory to go to Lower Ground 1) and you will be in a long hallway.
Exit just below the door at the back of the screen to go there, then use the entry panel. It asks for a Best Before date to unlock the door, and we got something food-related earlier…
Enter the code 28-09-72 to unlock the door and click Enter. Peperami will walk across a long gantry and arrive in a room with an elevator and some boxes.
Pick up the box to your left, use the lift gates, then use the box from your inventory on the lift. Now use the lift itself, and you will go down.
Exit at the back, a sharp right turn and find a weird looking device. Use it.
Switch the levers to Middle, Top and Bottom, then pull the large switch above them to turn on the machine. Now exit back towards the bottom right.
Pick up the box in the lift then use the lift to go back up. Then use the door and walk back across the gantry. Now exit at the bottom of the screen.
Use the entry panel on the left door (the location of the icon is a few pixels to the right of the panel itself).
Enter the code 14-11-95 and press enter.
Attack the carrot at the control panel. Then use the control panel.
Press the On/Off switch to turn on the control panel. It will ask for the correct cloning code, and we should now have all four pieces ready to go in our inventory…
Type in “LEDERHOSEN” and press the Enter key. If you’re playing on slower period-correct hardware, boy, do I feel sorry for you!
Now watch the cutscene and enjoy.
DOCKLANDS
Please save after the cutscene is finished!
Use the door and enter it (you can try to exit at the bottom of the screen, but Peperami will just walk back up the stairs). The point and click section is now done, but the pain’s not over yet.
OPPOSITE BAY 94
You must find and kill Carlos to win the game - in a maze-like map two times bigger than the last one. I have drawn the map once again as a guide.
The Highly Recommended Cheat from the SEWERS section still works here, so give it a shot if you’re having trouble.
In this map, more enemies will be throwing projectiles at you than the first time - these are hard to avoid, but the strafing keys (Z/X) will come in handy here.
There is also a 50-point health pickup in the starting area.
If you die, it’s game over - you have to start from the beginning. Ensure that you’ve saved before this point to avoid extreme frustration!
Please refer back to the SEWERS section for additional hints.
RECOMMENDED CHEAT FOR WHEN YOU JUST GIVE UP: This alternative version of the map which has all the items marked with coloured dots.
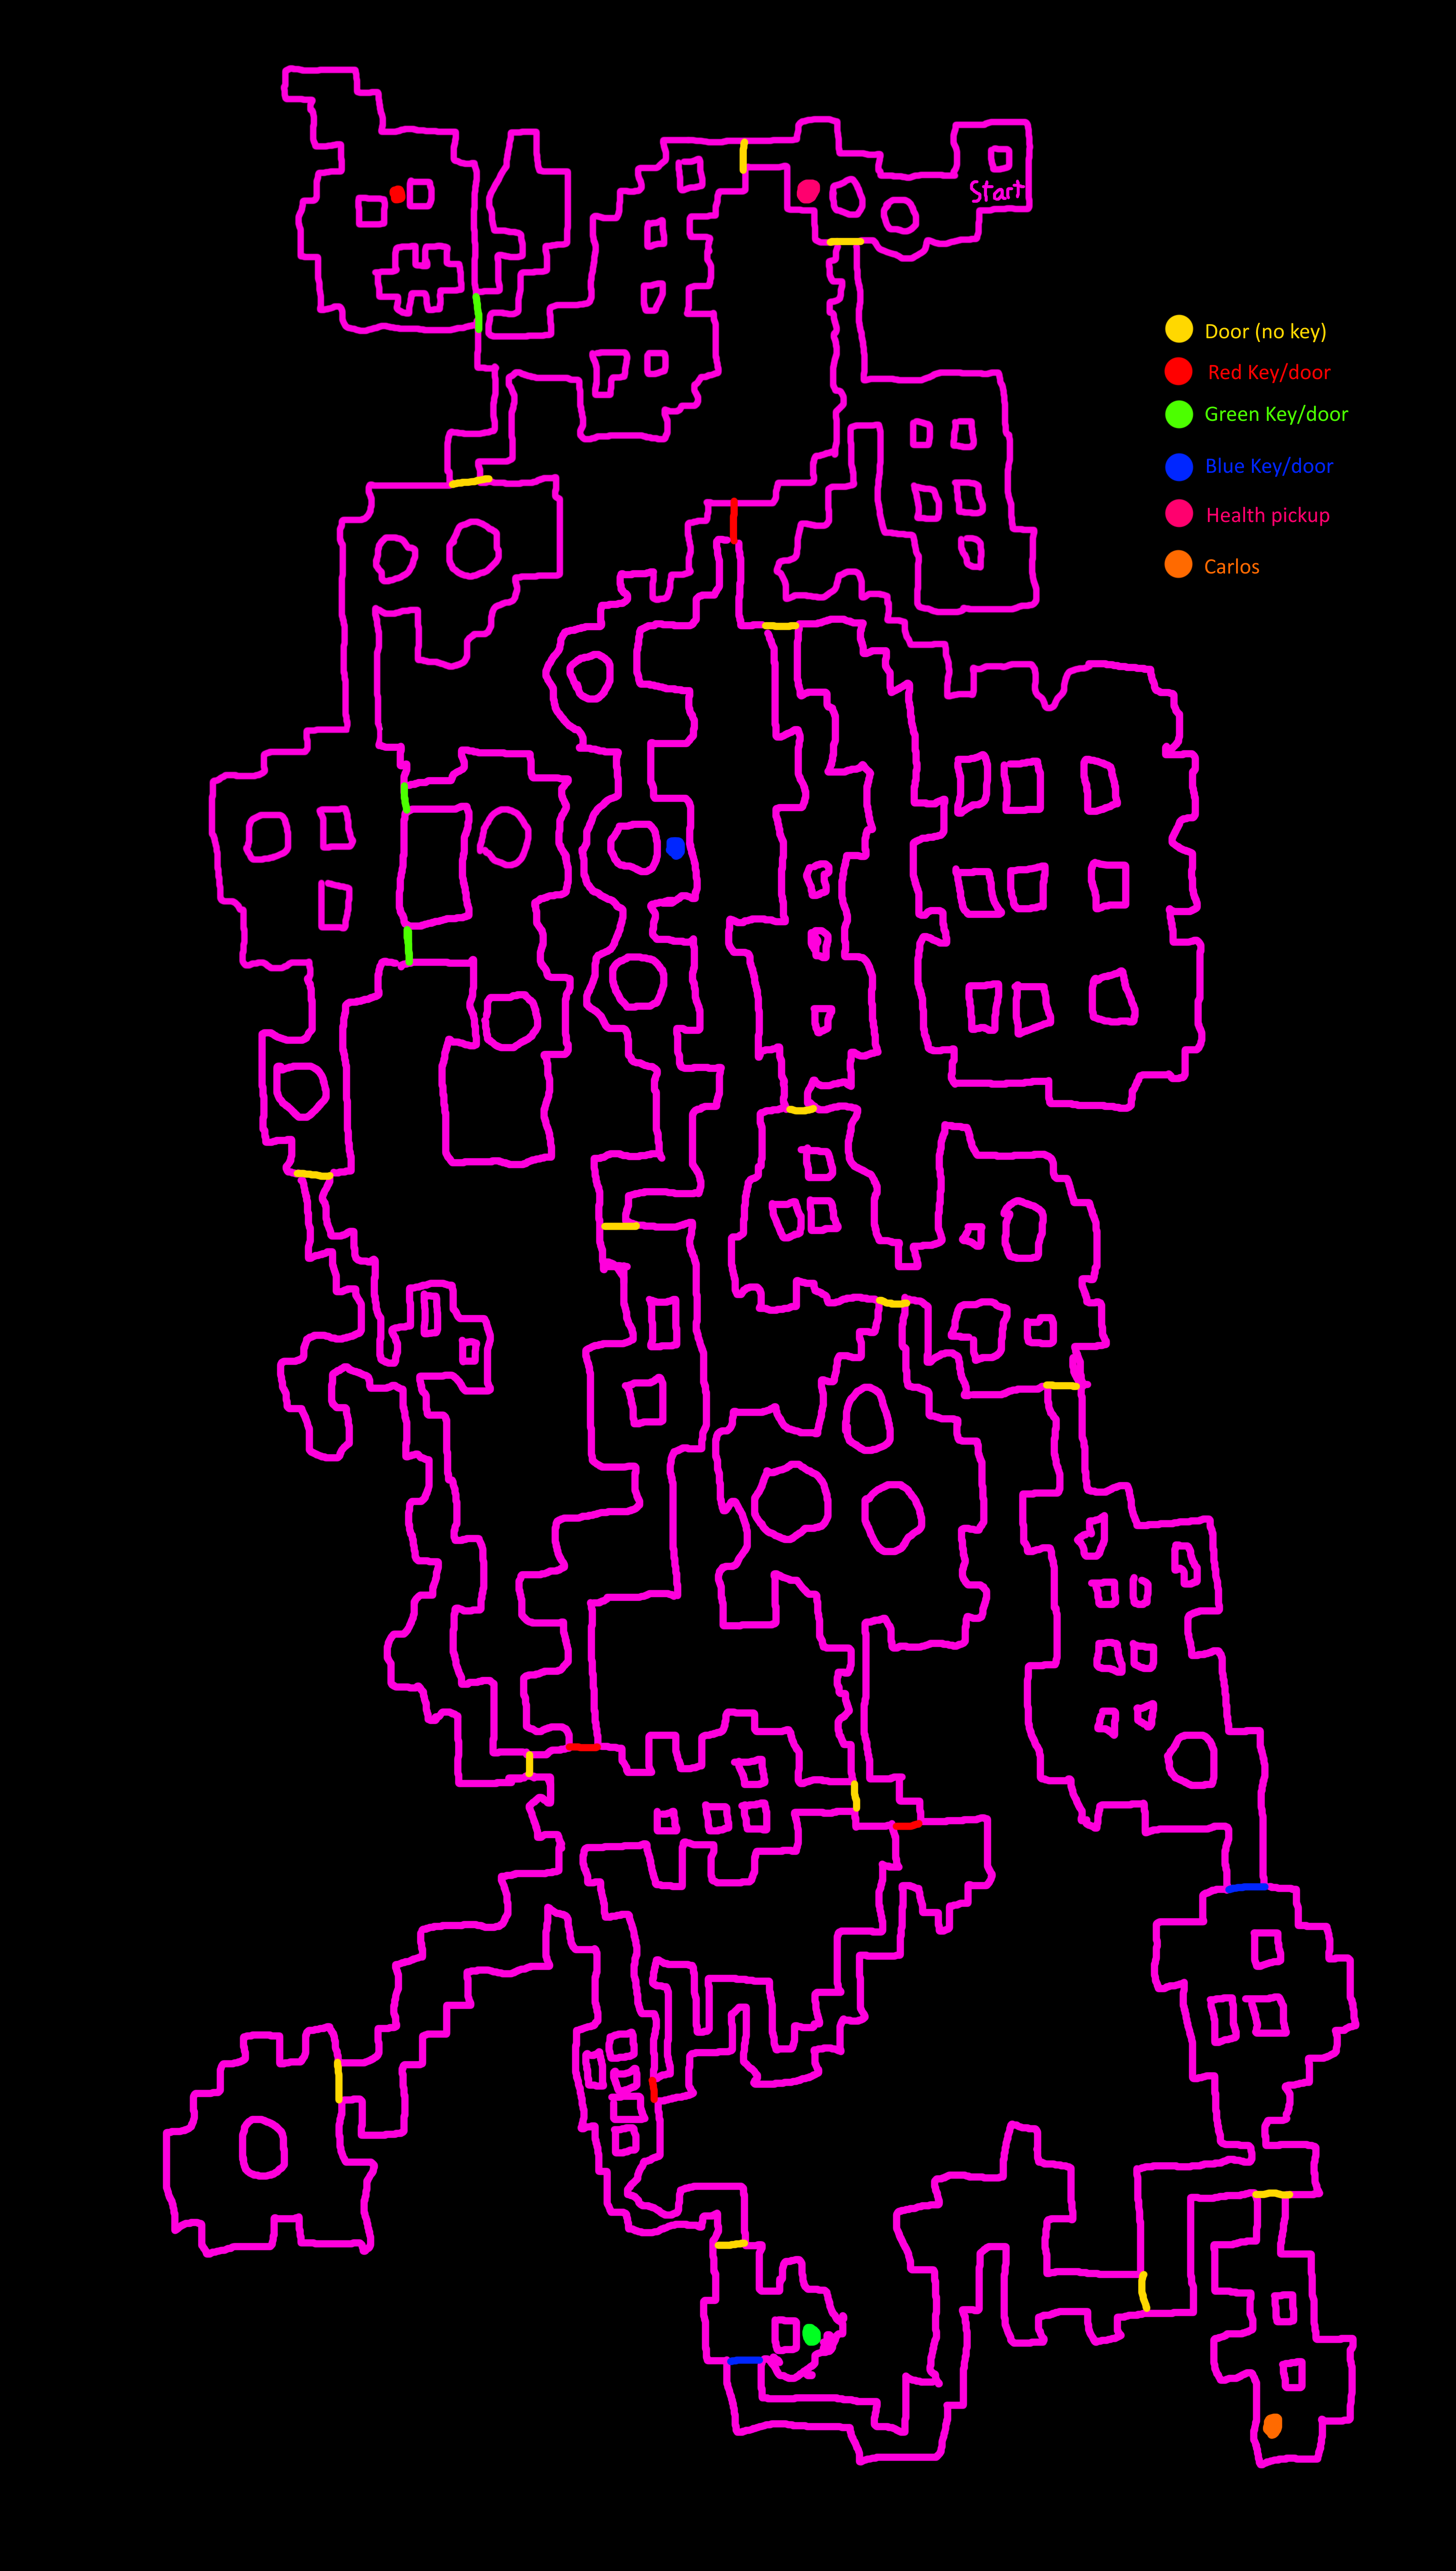
NUT BARON’S BAR
This is where the ending cutscene takes place. Congratulations on completing this game! You genuinely deserve an award for making it through. I hope this walkthrough was able to help.
Contact
Any questions or additional help? Did I get something wrong? Was I too snarky? Just wanna say hi?
Contact epa1257pen AT gmail DOT com, and I’ll try to help as best I can. Thank you!